Video Walkthrough
When setting up the Smart Camera with your 3 Point Wireless Network, it is strongly recommended to set up in this sequence:
- Set all Pressbox equipment up first
- Set up all Endzone equipment but DON'T raise the tower yet
- Set up all Sideline equipment and temporarily test the system at this location
- Once it is confirmed everything is working raise the endzone tower
- Lastly bring the iPad back up to the pressbox where you will connect to the Pressbox wifi and control the system from this location.
This method avoids most errors and reduces the amount of walking across the field.
3 Point Wireless Network Setup
Pressbox Equipment Setup
Equipment Overview - Pressbox Kit:
|
1.) Extension Cable/Power Strip 2.) Router Power Supply 3.) EDGE Box Power Cord 4.) Pressbox Router 5.) EDGE Box Ethernet Cable |
6.) EDGE Box 7.) Pressbox iPad Antenna 8.) Pressbox Bridge Antenna 9.) Camcorder + Tripod (not typically provided) 10.) Pressbox Bridge Antenna Tripod (not pictured) |
Step 1: Power up the Pressbox Kit
Simply plug the extension cord of the provided power strip into an AC outlet inside the pressbox.
Step 2: Attach the Pressbox Bridge to the Tripod or another Object and Position OUTSIDE the Pressbox as much as possible
Using the mounting clamp, attach the Pressbox Bridge Antenna to the tripod as shown below or to some object on the outside of the pressbox, for example a pole or window edge. The antenna will be pointed in between where the Endzone and Sideline Bridges will be.
- You may also clamp the antenna to another object outside of the pressbox - you are not required to use the tripod.
Angle this antenna in between where the Endzone and Sideline kits will be set up. The sideline kit should be set up on the 25 Yard Line of YOUR sideline for the game.
-
MAKE SURE THE BRIDGE HAS A CLEAR SHOT OF WHERE THE OTHER BRIDGES WILL BE SET UP FREE OF OBSTRUCTIONS.
- The antenna cannot be behind glass or in a narrow space. Nearby structures, glass, metal, or unrelated electronic equipment may cause interference. Place away from all of the above so that it has an open line of sight with Bridges on the field.
What if I can't place my Pressbox Bridge Antenna outside the pressbox, the window doesn't open or it isn't wide enough?
Ideally, the Pressbox Bridge can be set up in a pressbox with a large window capable of opening like this:
However, if the window does not open, is too narrow, or the pressbox is not traditional, the Pressbox Bridge can be placed elsewhere, for example on top of the pressbox. In this case you may need to replace the ethernet cable with a longer one.
The latch on the back of the antenna can be slid down to access the ethernet port. See Figure A below:
You can then use a longer cord, for example a 25-foot CAT6 ethernet cord (not included) in its place. This will give you the freedom to set or place the Pressbox Bridge antenna in a more ideal location, for example on top of the pressbox:
How should my Bridge Antennas be set up for an Away Game?
For an away game, the bridge configuration should look like this...
It's best to have your Smart Camera on the hash closest to your pressbox to avoid having the Endzone Bridge signaling through the field goal bars, which can be a major source of interference.
When your team is on the far sideline, you will set up the sideline kit equipment on that sideline at the 25 Yard Line closest to the endzone that your Smart Camera is positioned.
The Pressbox Bridge antenna should be angled in between the Endzone Bridge and Sideline Bridge. Split the difference.
Step 3: Set the Pressbox iPad Antenna on Window INSIDE OF ROOM with iPads
Take the iPad antenna and use the suction cup on the back to stick it to a window in the press box and position towards the coaches inside. The "rabbit ears" ideally should each be at a 45-degree angle.
What if I don't have a window or a traditional pressbox?
If you cannot suction cup the antenna to a window, you can set it elsewhere in the pressbox.
- The antenna can be set on a table.
- If all coaches with iPads are on top of the pressbox or in a "Crow's Nest" the antenna can be propped up in the Pressbox hardcase kit by the router.
- Do NOT attach the antenna to a chain link fence. Chain link is a notorious disrupter of wifi signals.
Important: All iPads connected to the Pressbox network - INCLUDING THE CONTROL IPAD - will need to be within 15 Feet of the iPad antenna. Any further and you will have issues with lag and latency.
Does the Pressbox Bridge antenna need to be in the same room as the iPads?
No it does not. Also the iPad antenna and Bridge antenna do NOT need to be in the same room or vicinity as each other.
- The round Pressbox Bridge needs a clear shot of the other Bridges down on the field. It does NOT need to be near any iPads
- The Pressbox iPad Antenna with "rabbit ears" needs to be near ALL iPads in the pressbox area.
- For these reasons, this is an appropriate alternative setup if needed:
What if I can't have the Pressbox Coaches' iPads and the Control iPad all in the same room or area as the Pressbox iPad Antenna with "rabbit ears"?
If an iPad is separated from the iPad Antenna by too much distance or a barrier such as a wall, ceiling, glass etc. you may still be able to connect to the SportScope Pressbox wifi but this can cause major network issues!
It is highly recommended to NOT take this risk!
If because of logistics not all iPads can be near the antenna there is a recommended option of "Hardwiring" the control iPad to the Pressbox Router so that you have the freedom of either moving that iPad to a new location, or moving the iPad Antenna to a different location.
Then your only limitation will be the length of your Ethernet cable.
See: How to use an iPad Ethernet Adapter
Or while using the Hardwired option you can also replace the current Ethernet cable of your iPad Antenna with a longer cable like so:
This will give you the freedom to move the antenna to a different location where multiple iPads are if needed.
Step 4: Connect Both Antennas to the Pressbox Router
Connect the black Ethernet cables from BOTH antennas into the pressbox router, into the ports labeled "Antenna" with the black dots. They are interchangeable, so you can plug either antenna into those ports. See the photo below for what it should look like when you're done:
Step 5: Setup your Pressbox Sony Camera
First, make sure that your Sony camera HDMI resolution setting is on "Auto" or "720p" and that Power Save is OFF.
How do I change the HDMI Resolution and Power Save settings?
| Open the Camera's Menu | |
| Go to Setup (The icon with the toolbox): | |
| Scroll down until you reach HDMI Resolution: | |
| If it isn't already set to it, change the HDMI Resolution to "Auto", or 720p | |
| After that, scroll down until you reach "Power Save" | |
|
If it isn't already, set this to "Off" This will prevent the camera from falling asleep while you're filming |
What if I don't have a Sony camera?
If you don't have a Sony branded camcorder, for example a Canon or JVC, you will need to first confirm that the camera is compatible with EDGE Replay: Camera Compatibility.
If it is compatible, you will then need to manually set the HDMI Resolution to 720p. Consult the camera model's user manual for instruction if needed.
Step 6: Mounting and Powering your Camera
Mount your Camera to your tripod:
If you have a Sony Camera with an internal battery (for example the Sony HDR-CX405), use the provided power cable and wall plug to keep the camera running for the entire duration of the game.
- Important! Not all wall adapter plugs will work. For guaranteed results use the provided Sony brand USB wall plug
Step 7: Setup the EDGE Replay box
If it is not done already, connect the power cable for your EDGE Replay box from the power strip in the hardcase kit to the power port in the orange EDGE box:
Next, connect the HDMI cable from the HDMI Out port of your Camera to the "CONNECT CAMERA" HDMI In port of the orange EDGE box:
If it is not already connected, connect the blue Ethernet cable from the EDGE Box to the Pressbox Router port labeled "Smart Camera/EDGE Box" with the blue sticker.
Step 8: Verify the Pressbox Camera Angle is Working
Next connect your master Control iPad to the Sport Scope PressBox wifi:
- Go to the iPad Settings > Wi-Fi > Select SportScopePressBox_S*****
- Input your password
- Verify you are connected to the wifi. You should see a blue checkmark and a message that says No Internet Connection. THIS IS CORRECT AND NORMAL.
- Then open the Sport Scope App > Select the 3 horizontal line Menu icon in the top left > and then select Cameras. You should see Pressbox - Ready on the screen as shown below. This means the camera and EDGE box are functioning correctly with each other and on the network.
NOTE: The Cameras page is the best place to start after setting up your equipment each time to verify that the system is working.
What if I don't see the Ready status?
- If you see pressbox - Not Connected or you do not see your camera flashing on the screen at all, go to iPad Says Not Connected to troubleshoot.
- If you see pressbox - Camera Offline or the status is flashing between Ready and Camera Offline go to iPad Says Camera Offline to troubleshoot.
WE RECOMMEND NO MORE THAN 5 IPADS IN TOTAL ON THE SYSTEM BETWEEN THE PRESSBOX NETWORK AND SIDELINE, WITH A MAXIMUM OF 3 ON THE SIDELINE. PLAN YOUR IPAD ARRANGEMENT ACCORDINGLY
Endzone Tower Setup
30' Tower Setup
Insert the tower into the base plate with wheels and then extend all 4 locking legs:
Then tighten all 4 knobs:
DON'T RAISE THE TOWER YET!
20' Tower Setup
Loosen the top mast knob and start spreading the three legs. It's easiest to anchor one leg against the ground and pull apart:
Expand the legs as wide as possible and then loosen the lower mast knob:
Lower the center mast pole to the ground and then re-tighten the lower knob:
Lastly, tighten the upper mast knob:
DON'T RAISE THE TOWER YET!
Endzone Equipment Setup
Equipment Overview - Endzone Kit:
|
1.) Network Battery 2.) Front Computer/Camera Battery 3.) Smart Camera Head 4.) Sony Camcorder |
5.) 30ft Ethernet Cable 6.) POE Injector 7.) Bridge Antenna 8.) Side Motor Battery (not pictured) |
Smart Camera Head Setup:
(Pictured: Many versions of the Smart Camera Head)
Step 1. Take the Wireless Camera out of the hard case and Plug the USB extender cable from the camera to the battery and plug in the Zoom Cord
Your handycam will come with a USB extension cable. It will normally be marked with white tape as pictured below. Use this to connect the handycam to the battery on the front of the Smart Head where it says "Camera" in white.
IMPORTANT! - The Sony camera has its own internal battery and it is highly recommended to charge the Camera itself from time to time. It can be charged like shown:
(This step is not required if you're using the Sport Scope Custom Camera)
Step 2. Open the camera view finder to turn the camera ON and make sure to EXIT any Menu screens if needed.
(This step is not required if you're using the Sport Scope Custom Camera)
What if I'm getting a message saying "Playback Mode Only" or something similar and I can't get out of the Menu screen?
If you're getting "Playback Mode Only" or "Cannot Record in USB Power Mode" or something similar, see:
How do I know if the camera is using the battery power correctly?
Step 3. Connect the provided Short HDMI Cable to the Camera and Wireless Head
You will take the small end of the HDMI cable and (1) plug it into the Sony/Custom camera, on the same side as the viewfinder. The large end of the cable will (2) plug into the blue box, into the port labeled "CONNECT CAMERA."
Step 4. Mount the camera head onto the tower.
If you have the below mount type, be sure to push all the way down. BOTH O-Rings should be fully inserted.
What if my mount is different?
If you have the below mount type, screw the entire Wireless Camera head 360 degrees on to the threaded screw in the top pole. Make sure not to cross-thread and do not have yellow motor cord plugged into battery yet. Remember: right-y tight-y, left-y loose-y.
Step 5. Connect the yellow motor power cable to the side motor battery
Your side motor battery may look different than the one pictured below but connects the same way.
What if I have an older system that doesn't have a side Motor Battery?
If you only have one front battery that looks like the picture below, we highly recommend Converting the XTPower (Pre-2020) Smart/Wireless Camera Battery to the New Battery Setup
If you have the cylinder battery, we also recommend replacing it with the new side motor battery but this is less critical. The cylinder battery setup looks like this:
The latest motor battery can be found online for purchase HERE and a male-to-female USB cord for the camera connection can be found HERE.
If purchasing on your own you will need to provide your own adhesive velcro in order to attach the new motor battery to the side of the blue camera head:
Step 6. Connect the 30-foot Ethernet Cable key ring to the carabiner already attached to eyelet screw.
Make sure that there is a loop on the Ethernet cable to ensure the weight of the cable is on the relief hook, and not on the Ethernet port, as shown below. Then connect to the Ethernet port as shown:
Important: Do not tamper or remove the breakaway adapter cords connected from the plate to the ports in the blue camera head unless instructed to do so.
What if I don't have the Port Protection Plate Ethernet Connection as pictured above?
Important: This step is mandatory. Failure to use the strain relief can damage the Ethernet port of the Wireless Camera and is not covered under warranty.
Connect the carabiner to the strain relief hook
A carabiner is connected to the end of the 30’ blue Ethernet cable. Attach the carabiner to the hook located at the bottom right corner of the Wireless Head. See photo for reference.
Connect the Ethernet Cable to the Wireless Head
Connect the Ethernet cable into the port labeled “Ethernet”. Make sure that there is a large loop on the Ethernet cable to ensure the weight of the cable is on the relief hook, and not on the Ethernet port, as shown below.
It is highly recommended to have the Port Protection Plate installed on your unit if you do not have it yet.
Call (or Text) at our Support number directly: 509-204-3270
Or Email us at support@sportscope.com
Step 7. Connect the Power Cable for the Wireless Head LAST
Plug the small end of the computer power cable to the Power port on the blue box (1), and the large end into the battery (2) (This is the black cable with the blue USB end)
Endzone Networking:
Step 1: Connect the Endzone Battery to the white POE Injector.
Step 2: Plug Bridge Antenna and Smart Camera into the POE Injector
Connect the black Ethernet cable from the Endzone Bridge antenna into the POE Injector on the port labeled "Antenna" (black sticker).
Then connect the other end of the blue 30-foot Ethernet cable from the Smart Camera into the other port (blue sticker). See photos below for reference:
Step 3: Attach the Bridge Antenna to the Tower
Make sure to angle the Bridge Antenna directly toward the Pressbox Bridge antenna.
What is the most optimal way to setup/angle the Endzone Bridge antenna?
The most optimal way to ensure a good connection between the Endzone Bridge and Pressbox Bridge is first:
- Make sure there are no physical obstructions in its path, for example the field goal bars, fencing, large bodies of people, sleds, etc.
- The higher the antenna can be, the better. See example of how some past customers have elevated the antenna:
- Don't angle the antenna as high as you think. The angle can be deceiving. A better signal is achieved by defaulting to a lower, or more horizontal, angle towards the pressbox like shown (although some upward angle is necessary):
- In summary:
- Avoid obstructions
- Higher antenna elevation
- Lower antenna angle
Step 4: Switch on the battery to power the POE Injector and Bridge Antenna
On your Endzone Battery there is a toggle switch to turn on the AC outlet port. Switch this into the "ON" position to give power to your antenna. See the picture below:
It will take about 2 minutes for the antenna to power up completely and link.
- Pay attention to the lights on the side of the Bridge antenna.
- Once it is fully powered and has connected to the Pressbox Bridge antenna, you will see a total of 6 lights.
- 1 solid power light
- 1 flashing light for Main
- 4 solid lights to show the signal strength of the link
What if I don't have all 6 lights?
If your antenna does not have all 4 link lights: double-check that the endzone bridge antenna is aimed at the pressbox and there are no obstructions interfering with the signal.
If you have all 4 link lights but the flashing Main light is not on, that means that the antenna isn't reading the Endzone Camera.
- Make sure the Smart Camera Head is powered on and that the Ethernet cable is connected correctly.
- You may want to re-plug the Smart Camera head power cord (with blue tape) back into the battery to reboot the computer.
Sideline Equipment Setup
Equipment Overview - Sideline Kit:
|
1.) Sideline Switch 2.) Switch Power Supply 3.) Sideline Bridge Antenna 4.) Network Battery |
5-6.) Sideline iPad Antenna + Separate Booster (if applicable) 7.) Antenna Tripod |
Pictured above is your Sideline Kit. This is the kit that the coaches on the sideline will connect to. Systems purchased in 2025 or later will most likely have the iPad Antenna below in place of 5 and 6 pictured above:
Step 1: Set the Sideline Kit between the 20-25yd line on the side of your Endzone Camera
Remind me how to set up for an Away Game
If you're setting up for an Away game, you'd set up your Sideline station on the 25 Yard Line that is adjacent to the End of the field where your Endzone will be set up.
DO NOT set up your Sideline and Endzone on opposite ends of the field from each other.
Step 2: Attach the Antennas to their tripod
Using the provided clamp mounts and/or velcro or zip tie, attach your antennas to your tripod as shown below:
Prior to 2025, you will have a 2-part iPad antenna with rectangular Booster panel in addition to the round Bridge:
Note: You will need to connect the booster panel to the iPad antenna. Simply screw the 2 cables on the base of the booster panel onto the threaded tips of the iPad antenna
How do I make sure the Antenna Tripod is Stable in the wind?
After everything on the sideline is set up, you can use the provided velcro strap to attach the hardcase handle to the base of the tripod as shown below. This should provide enough weight to the tripod base to prevent it from tipping over:
Step 3: Connect the antennas to the router and POE injector
What if I have don't have a POE Injector and I have the 2-part iPad antenna with Booster panel?
Simply connect the black Ethernet cables from both antennas into the sideline router, into the ports labeled "Antenna." They are interchangeable, so you can plug either antenna into those ports. Then skip to Step 4.
(1) Connect the round Sideline Bridge antenna directly into the Switch in the black labeled port: Bridge Antenna (2) The iPad Antenna must plug into the POE injector in the black labeled port: iPad Antenna. As shown below:
(3) Make sure that the short yellow "POE Data Link" ethernet cord is connected from the yellow Switch Link port on the POE injector to the yellow POE Link port on the Switch:
Then ensure that both the Switch and POE injector power cords are connected to the Y-splitter Power adapter and that the adapter is plugged into the AC port of the battery:
Step 4: Turn on the sideline Battery
On your Router Battery there is a toggle switch to turn on the AC outlet port. Switch this into the "ON" position to give power to your router. This will provide power to the router. See the picture below:
Step 5: Angle the Antennas
The Sideline Bridge Antenna needs to be aimed directly at the Pressbox Bridge Antenna. The iPad antenna and/or Booster antenna needs to be facing down the sideline away from your Endzone tower.
Again it will take a few minutes for the antennas to boot. The Sideline Bridge should eventually show all 6 lights just like the Endzone. The Sideline iPad Antenna will generate a SportScopeSideline Wi-Fi network that any iPad on the sideline can join.
- The password is the same as the pressbox and is also in the same location in the Sideline hardcase kit
WE RECOMMEND NO MORE THAN 3 IPADS FOR WATCHING REPLAYS ON THE SIDELINE
Step 6: Verify
Once this is complete, connect your iPad to the Sport Scope Sideline network. Just like before, open the menu on the left and tap on Cameras to check the status of the cameras. Verify that you can see both the Pressbox and Endzone camera:
What if my endzone angle is not Ready?
- If you see endzone - Not Connected or you do not see your camera flashing on the screen at all, go to iPad Says Not Connected to troubleshoot.
- If you see endzone - Camera Offline or the status is flashing between Ready and Camera Offline go to iPad Says Camera Offline to troubleshoot.
Next we will create a test game to temporarily test the Smart Endzone Camera on the field to make sure everything is working:
- If you do not know how to create a new game yet, go to: How To Create and Start a Game.
Once the game is created:
- If the controls panel is collapsed, tap the arrow to un-collapse it:
- Verify the endzone live video feed is on and the pressbox angle Ready status is in the top left corner.
- YOU WILL NOT SEE LIVE VIDEO FOR THE PRESSBOX ANGLE. THIS IS NORMAL AND CORRECT.
- If the endzone angle is in the top left corner tap on it to switch angles.
- Test the motor controls (by default on the right hand of the screen).
- Test the zoom controls (by default left side of screen).
- Record a few test clips using the red record button.
- Tap the thumbnail of the clip you recorded at the bottom of the screen and if you have two angles make sure you can watch the replay for both angles.
Assuming everything is working, the best practice is to turn off the Wifi from the iPad settings and now head back to the Endzone to raise the tower.
What if my Zoom is not working?
If the zoom controls on the left side of the screen for control of tight and wide of the Sony Camcorder are not working see: Zoom is Not Working - Smart/Wireless Camera
What if my Pan and Tilt (left, right, up or down) controls are not working?
- If none of the pan or tilt controls are working and you're getting "Double Zoom" on both sides of the screen see: Both Pan & Tilt Not Working (AKA Double Zoom) - Smart/Wireless Camera
- If pan left and right is working but tilt up or down is not working see: Tilt is Not Working (Up and Down) - Smart/Wireless Camera
- If tilt up and down is working but pan left or right is not working see: Pan is Not Working (Left and Right) - Smart/Wireless Camera
What if one of my camera angles has distorted video?
If the endzone angle video is distorted on the live feed or the pressbox angle camera has distorted video on the replay test clip then select the following:
- Endzone is distorted: Distorted Video on iPad - Smart/Wireless Camera
- Pressbox is distorted: Distorted Video on iPad - EDGE Replay
Raising the Tower
- Loosen top knob and slide pole up.
- Once you feel the stopper, slide the pole down a few inches.
- Lock the knob and clip the blue ethernet cable into the large carabiner.
- Repeat with each pole to reach desired height.
IMPORTANT! - Always keep two hands on tower poles when raising or lowering for safety.
Return to Pressbox to Control the System with the Master iPad
Once complete, walk back up to the pressbox and connect to the SportScopePressbox Wi-Fi again to finally control the system for your game. You may create another new Game.
Congratulations, the setup is now complete!
How to Upload Film, Breakdown, and Storage Tips
How to Upload Film & iPad Clip Downloads
- All upload instructions can be found HERE.
- Once the game is over and BEFORE breaking down any equipment, be sure to review all the clips looking for Blue Download Arrows on the iPad you're going to Upload from.
- Tap on them to download the clips. Check both angles.
-
There should be NO BLUE ARROWS REMAINING before you Share your Game.
- Learn more about ensuring all clips are downloaded and How to Upload Film at Upload to Hudl from iPad
Smart Camera
- If you have the "Pop-in" style mount with O-rings, see below for how to dismount:
-
- If you have the screw on style mount, see below for how to dismount:
-
- Keep the Sony camera on the Wireless Camera at all times and the L-shaped zoom cord plugged into the Sony camera at all times as well.
- Make sure the 2 unmarked black USB cables next to the Ethernet port are ALWAYS plugged in. These cables should never be unplugged.
- Always unplug the computer power cord (with blue color-coded tape) and the short HDMI cord from the blue Smart Camera head before storing the head in the foam of the large hardcase.
-
Important: If you are using the Record to Camera option, the memory card is needed for the zoom to work when you are recording to the memory card. If the memory card gets full, the zoom will stop working. Be sure to empty the SD card between games if you are saving the recording to the camera to prevent this issue from happening.
- The ideal way to clear the SD card is in the camera by going to the Sony camera's Menu > Setup > Format.
Sideline Network
- Best practice is to unscrew the two Booster cords from the Sideline iPad Antenna before storing in the network bag. Do NOT store with the Booster connected to the Sideline iPad Antenna.
Can I use the system in the rain?
Yes, the system can be used in the rain but you MUST apply the rain gear:
Smart Camera Backup Parts
- 30' Ethernet Cable
- 1' HDMI Cable
- 7' Ethernet Cable for Antennas
-
Pressbox HDMI Cable (if applicable)
- *Please confirm your pressbox camera uses Micro HDMI and not Mini HDMI. If your camera does require Mini HDMI, a replacement can be found here
- Pressbox Ethernet Cable for Edge Replay (if applicable)
- Longer Pressbox Ethernet Cable for Antennas (optional)
- Cables for Booster Antenna (Note: you MUST buy two; they only work in pairs)
Power cord pack (IMPORTANT: See image below to carefully determine what type you need):
- If you have Type A then use this cable
- If you have Type B (w/ blue sticker) then use this cable

Upgrades/Modernization:
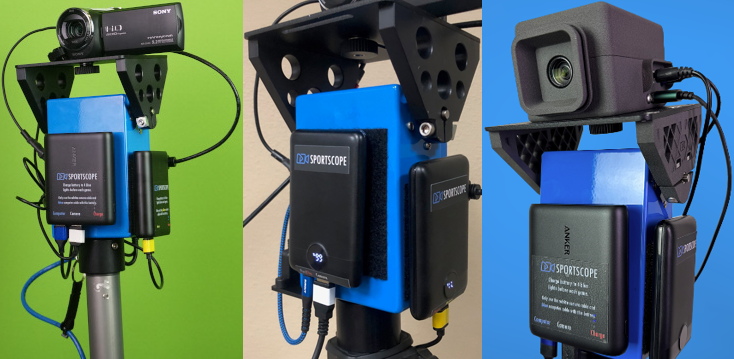
While it's not a requirement, we would recommend making sure you have the latest updates we have made. Two important things we recommend are making sure you have our latest battery solution, especially if yours are 3-5 years old or having performance issues/not lasting an entire game.
Battery Upgrade:
First take a look at the picture below to see which battery setup you have.
- If you have the 2018/2019 battery where all three cords plug into one battery, you should seriously consider upgrading. That battery is almost certainly going to have a diminished battery life due to it's age and we have found that powering all three devices off a single battery, especially motors and the onboard computer, has an impact on performance.
- If you have the 2020/2021 setup, likely the battery on the front still has decent lifespan and has not yet aged out, but just like the 2018/2019 setup, separating the motors to their own battery has provided a more responsive system with a smaller chance of issues.
- If you have the 2022 battery, you are up to date!
Port Protection Plate (if not already installed):
This protects your computer’s Ethernet port from damage. HIGHLY RECOMMENDED AND ONLY $30 + SHIPPING!

If you are interested in upgrading your battery or getting the Port Protection Plate, contact us for a quote!
Call or Text Support at 509-204-3270
Or Email us at support@sportscope.com
We also have a video about all the ins and outs of using the system here:
We're available via Call (or Text) at our Support number directly: 509-204-3270
Or Email us at support@sportscope.com
Support Hours
Our current* regular business support hours are as follows:
| Pacific Time | Mountain Time | Central Time | Eastern Time | |
| Monday | 7:00 AM - 7:00 PM |
8:00 AM - 8:00 PM |
9:00 AM - 9:00 PM |
10:00 AM - 10:00 PM |
| Tuesday | 7:00 AM - 7:00 PM |
8:00 AM - 8:00 PM |
9:00 AM - 9:00 PM |
10:00 AM - 10:00 PM |
| Wednesday | 7:00 AM - 7:00 PM |
8:00 AM - 8:00 PM |
9:00 AM - 9:00 PM |
10:00 AM - 10:00 PM |
| Thursday | 7:00 AM - 7:00 PM |
8:00 AM - 8:00 PM |
9:00 AM - 9:00 PM |
10:00 AM - 10:00 PM |
| Friday | 7:00 AM - 7:00 PM |
8:00 AM - 8:00 PM |
9:00 AM - 9:00 PM |
10:00 AM - 10:00 PM |
| Saturday | 7:00 AM - 3:00 PM |
8:00 AM - 4:00 PM |
9:00 AM - 5:00 PM |
10:00 AM - 6:00 PM |
| Sunday | Closed | Closed | Closed | Closed |
*Note: The above hours are subject to change depending on current demand for support.
Rest assured that you can expect extended evening support hours during the fall football season.