Download the PDF Instructions Here
Camera Set Up
When you get your camera you will need to change a few settings to make it work properly with your Quick Scope.
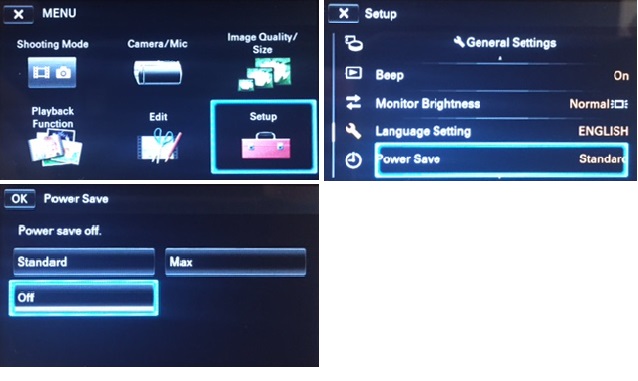
Turn Off Power Save
Power Save turns the camera off after 5 minutes.
In the Setup menu
1) Select Setup
2) Select Power Save
3) Select Off
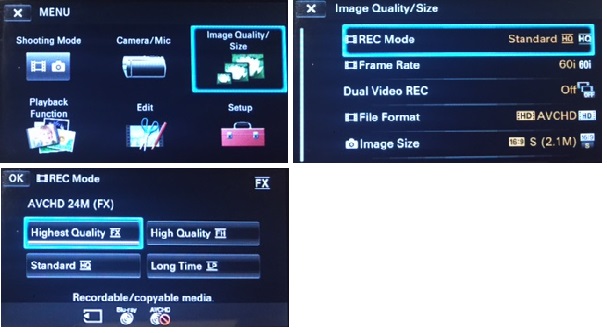
Set Record Quality to HD
1) Select Image Quality/Size
2) Select REC Mode
3) Select High or Highest Quality
View Record and Battery Info on LCD Monitor
1) Select Camera/Mic
2) Select Scene Selection
3) Select Bottom right arrow
4) Leave on last screen. Do NOT exit.
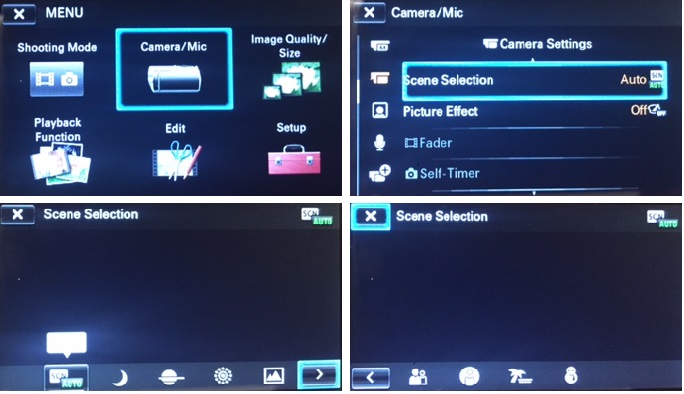
This is an optional step for those interested in displaying Record/Standby & Battery Info on the monitor screen. You are not required to perform this step
Set Up Instructions
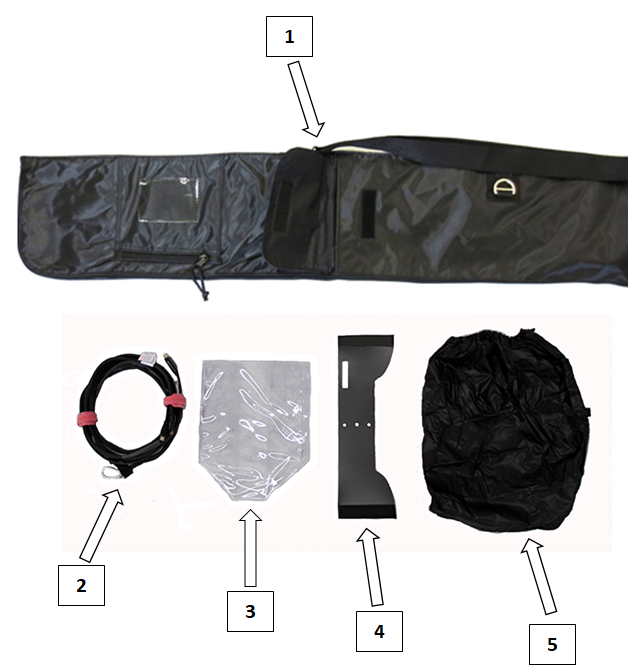
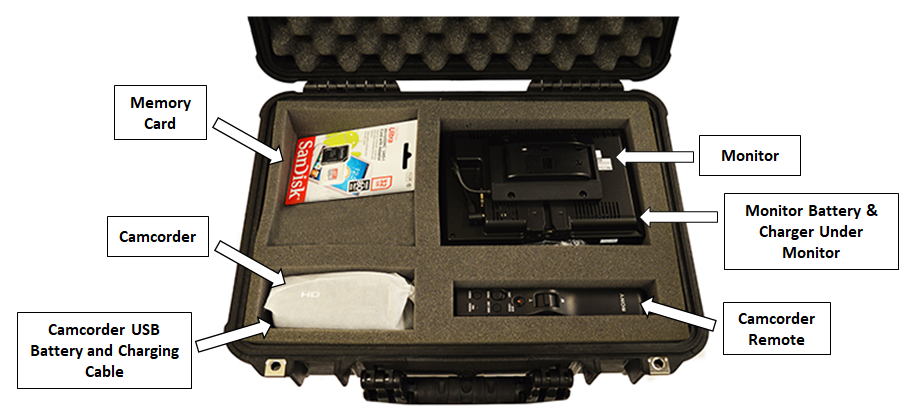
The Quick Scope pole comes in a travel bag. Inside your travel bag’s (1) pocket you will find (2) a wrapped cable, (3) camera lens cover, (4) monitor rain cover. (5) There is also a black waterproof cover for the camera.
The electronics for the Quick Scope can be found in the Hard Case. You will be using the camera and its external USB battery, memory card, the HD Monitor and its battery, and the camcorder remote.
When the Quick Scope pole is out of the travel bag you will see (1) the monitor swivel mount, (2) the remote plate where you clip your camera remote, and (3) the camera mount.
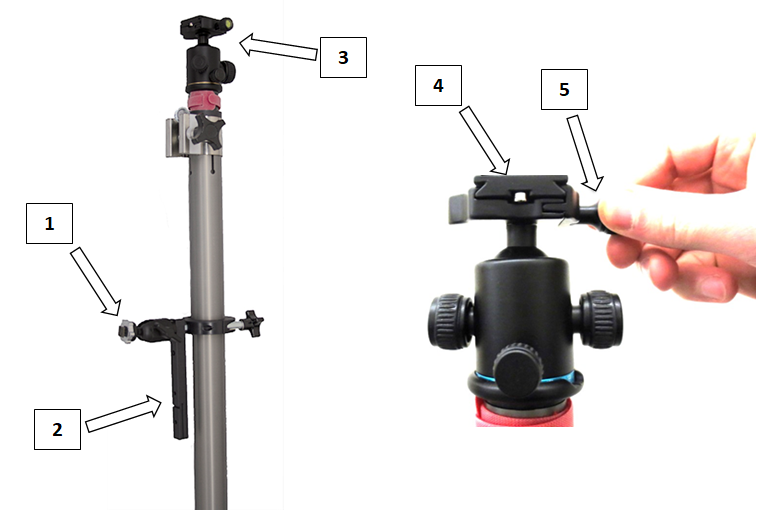
To set up the Quick Scope, (4) slide the quick release plate off the camera mount by (5) loosening the knob as shown.
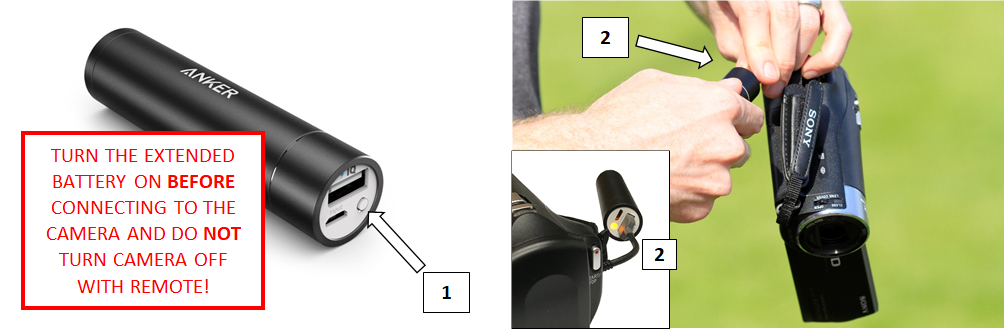
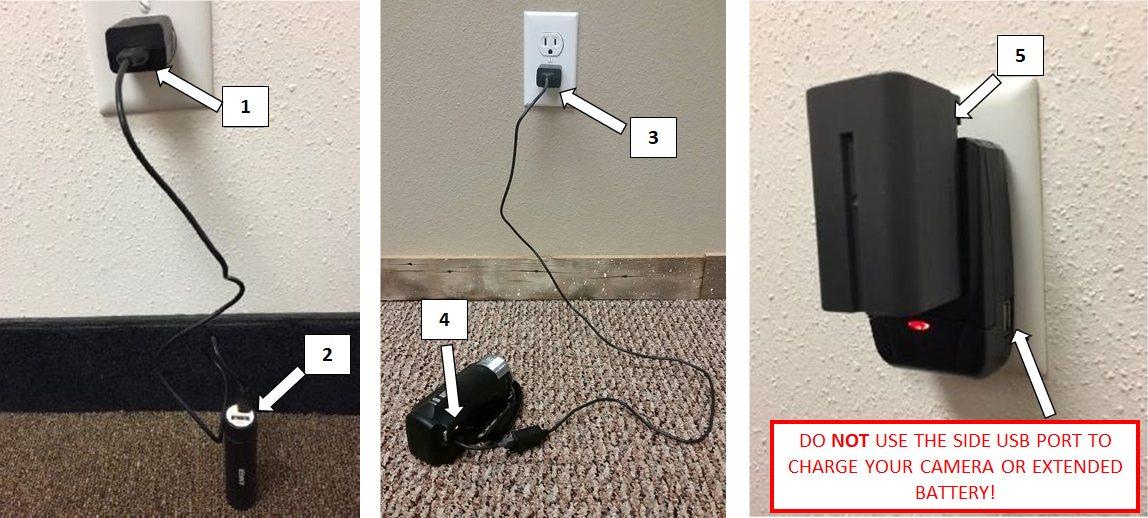
Remove Sony camera and extended cylinder battery from hard case. Make sure micro SD memory card has been inserted into side slot. (1) First open viewfinder to turn ON camera. Next turn ON extended battery BEFORE connecting to camera. (2) Connect USB cord from camera to extended battery.
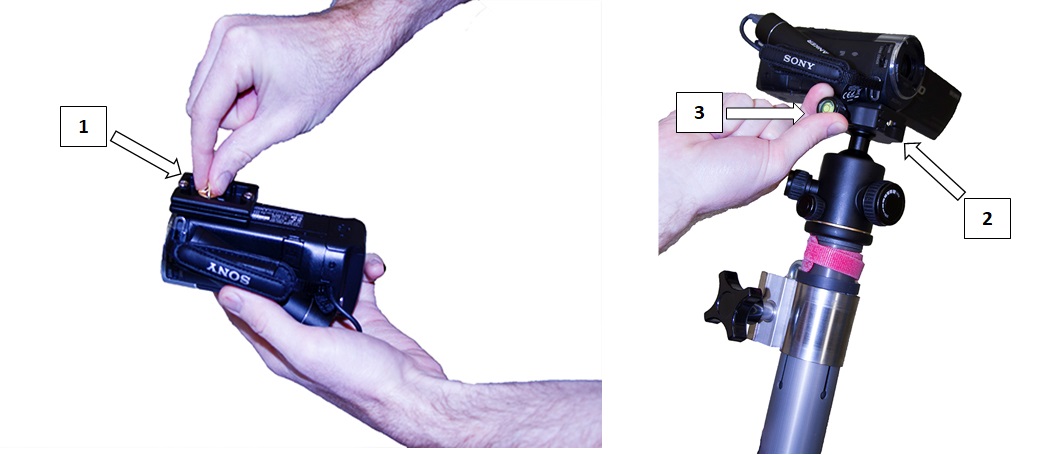
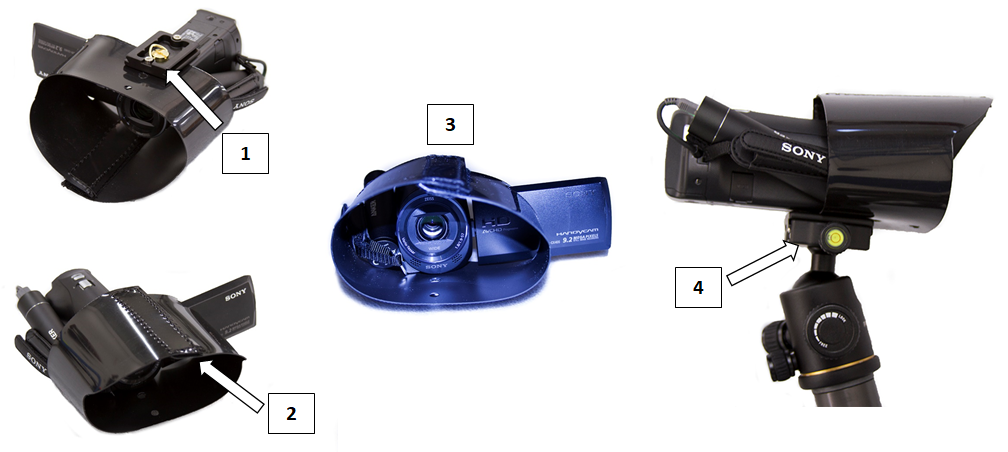
Next, put the camera on (1) the quick release plate and tighten into place. Then (2) slide the quick release plate back onto the camera mount and (3) tighten the knob to secure the camera and quick release plate.
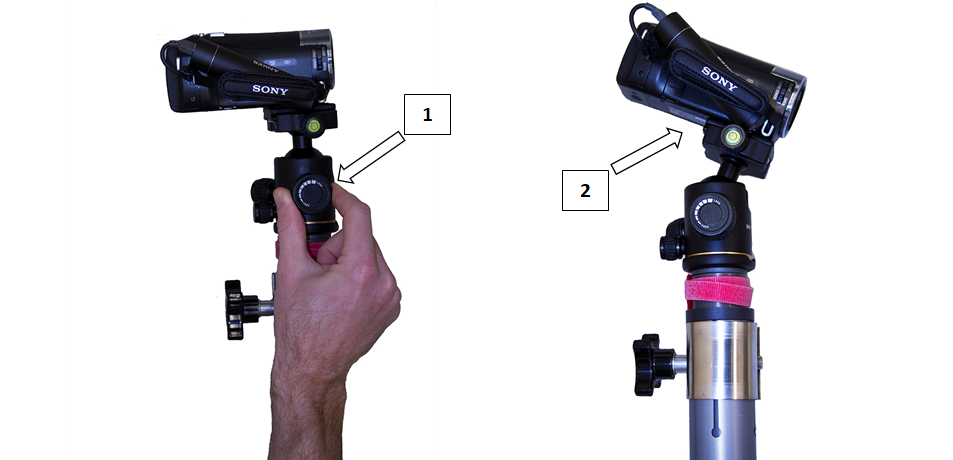
You may need to adjust the camera’s position by (1) loosening the knob and (2) tilting the camera and then tightening the knob to secure the camera into place

Now (1) slide a charged monitor battery into the battery plate as shown. Then (2) slide monitor over the monitor swivel mount and tighten the silver knob against the back of the monitor to secure it.
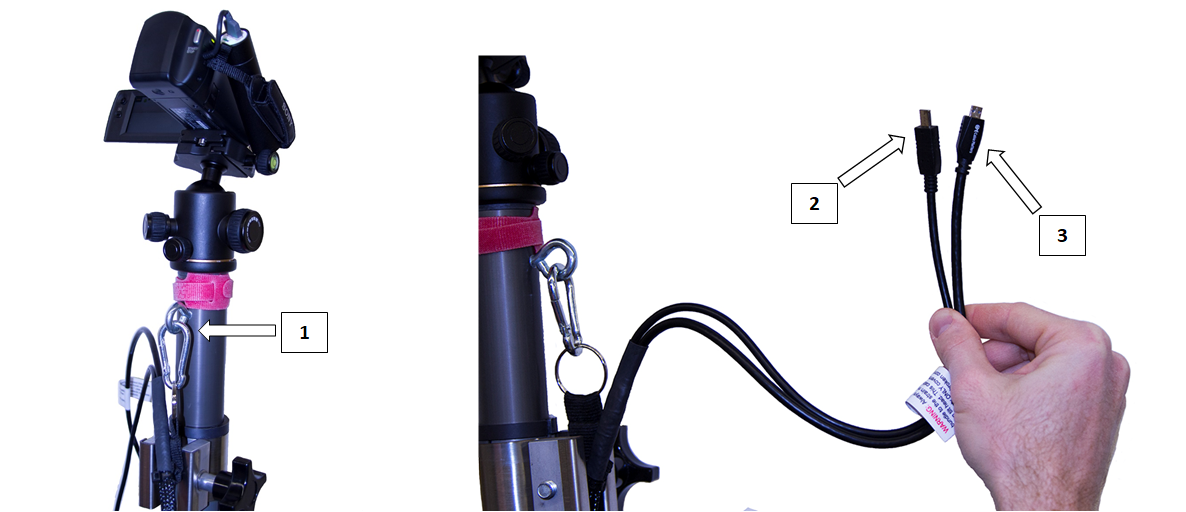
To attach the cable, first (1) clip the carabineer attached to the cable to the eye-hole bolt of the Quick Scope pole. Next, we will connect the (2) Remote Multi-terminal connector to the camera’s multiport and the (3) HDMI Micro connector to the camera’s HDMI Micro output.
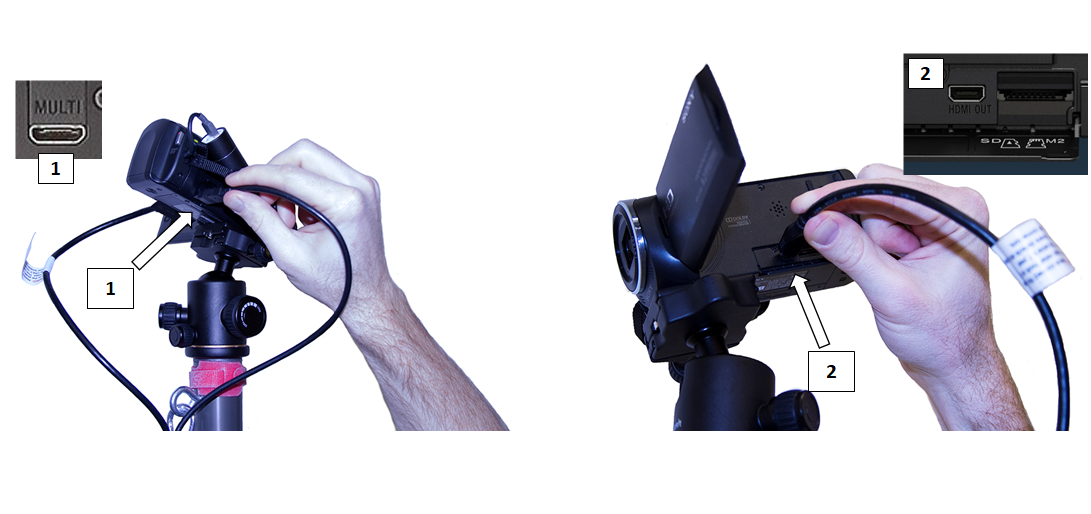
(1) Attach multi-port end into the camera’s MULTI port. This controls the zoom and record of the camera. (2) Attach micro HDMI end into camera’s HDMI OUT port, this is for the video feed down to the monitor.
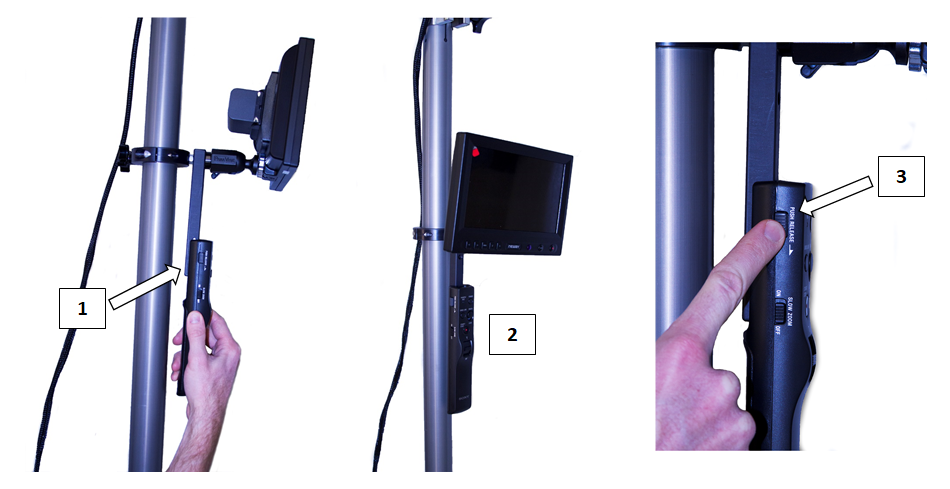
Next, slide the (1) camera remote on to the mount as shown. (2) The camera remote controls the zoom in/out, record/standby, and on/off of the camera. The REC light on the remote will be RED when recording and GREEN when in standby. Use the (3) release button to remove the remote when you’re ready to remove it from the mount.

To raise the Quick Scope pole, (1) first remove the Velcro strap. Then (2) loosen the knob as shown. (3) Raise the pole to desired height and tighten the knob securing the pole into place. IMPORTANT: Always keep one hand on the pole you are raising or lowering to prevent the pole from coming down unexpectedly. (4) Use the Velcro strap to secure the cable, preventing it from getting caught on other equipment or blowing in the wind.
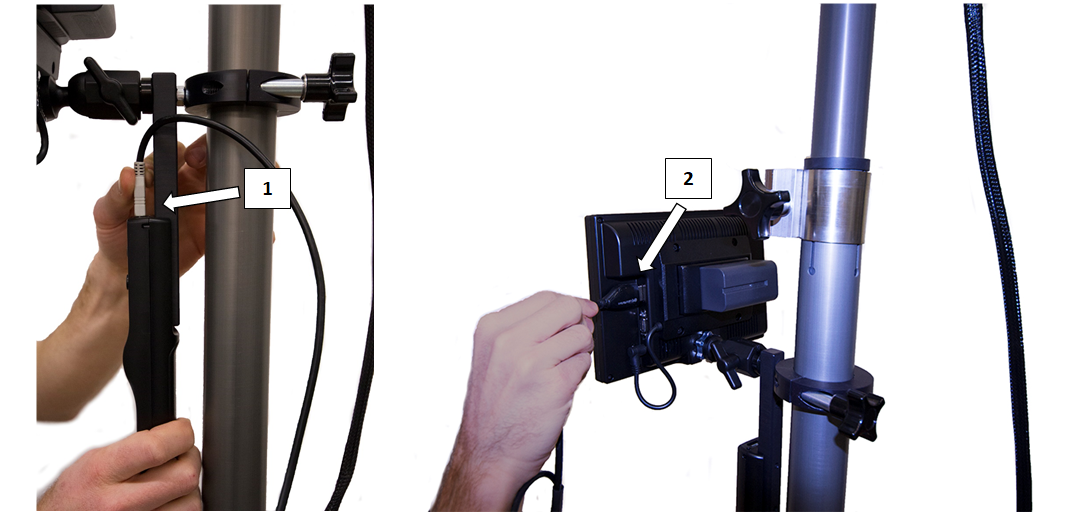
Connect the (1) white/gray multiport male connector to the female multiport input port in the top of the remote as shown. Then (2) connect the male HDMI connector into the female HDMI input port on the side of the monitor as shown. Make sure the monitor’s input setting is on HDMI by pushing the AV/PC button on the monitor. You should now have picture and be able to zoom with the camera remote.
Rain Gear Instructions
All rain gear is found in the pocket of the travel bag. (1) Find the black lens hood. (2) This flexible lens hood can be folded over onto itself and the Velcro holds its position as shown. (3) To begin the attachment process, you will first loosen the camera mount knob and (4) slide the quick release plate from the camera mount.
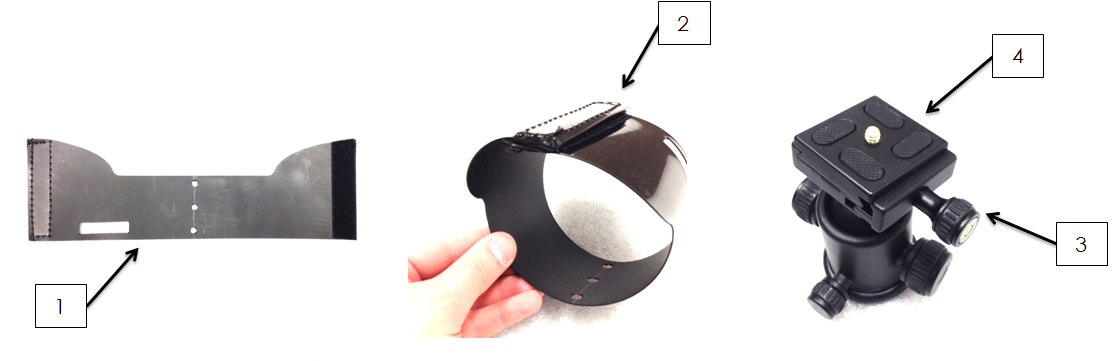
Next, (1) line the black lens hood up with the camera’s thread, found on the bottom of the camera and attach the quick release plate through one of the lens hood’s holes as shown. Be sure to tighten the quick release plate screw into the camera to secure the lens hood. (2) Fold the lens hood around the top of the camera, inserting the viewfinder through the slit, and Velcro as show. The lens hood should cover (3) the front of the camera lens by several inches as shown. (4) Attach quick release plate with camera and lens hood back onto the camera mount.
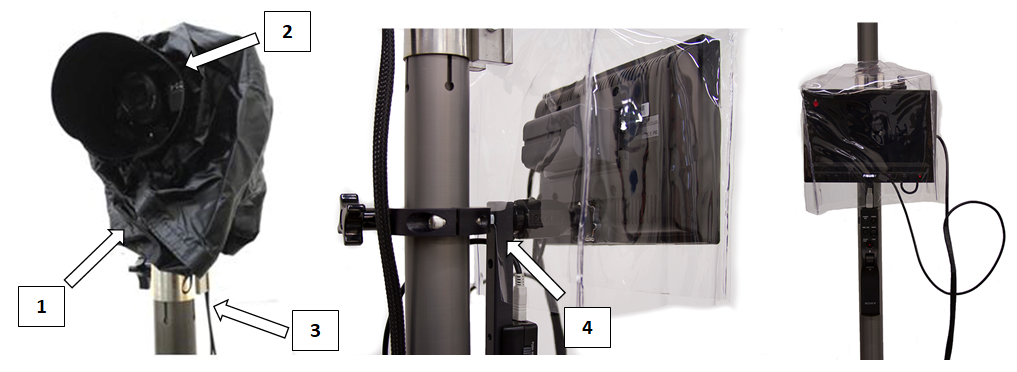
Next, (1) Open the large Velcro opening of the black waterproof cover and slide it over camera and then close the Velcro. Position (2) the small bungee opening around the lens hood and tighten as shown. Close (3) the large bungee opening. Make sure all the cable connections are also covered by the waterproof cover. Finally, put (4) the clear monitor rain cover over the monitor and remote plate.
Battery Instructions
The Quick Scope has three battery sources that power the monitor and the camera.
| Extended USB Camera Battery: lasts 5-6 hrs. | Internal Camera Battery: lasts 45min-1hr. | Monitor Battery: lasts 4-5 hrs. |
Transferring Video to Computer
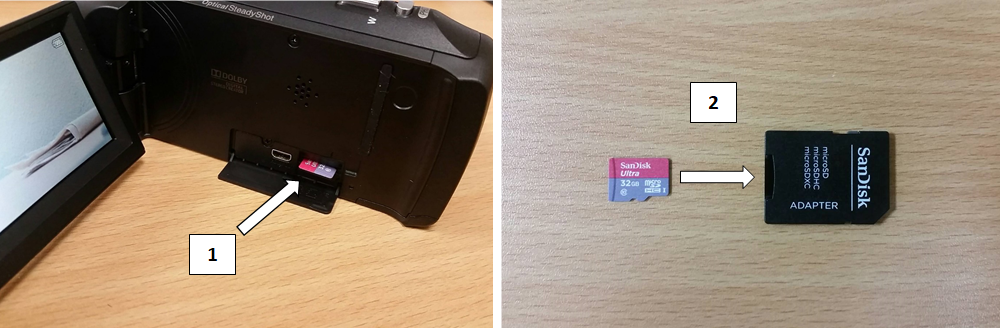
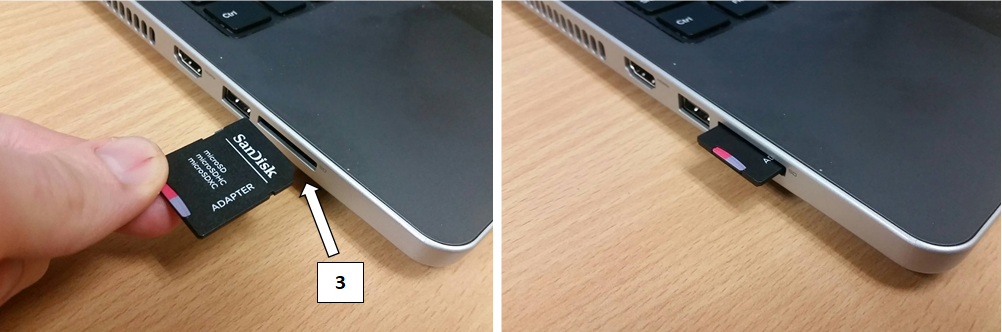
The camera records the video to the micro SD memory card. To transfer the video to your computer for viewing or editing, (1) Tap the micro SD card inward into the camera slot so that it releases and then remove. (2) Insert micro SD card into standard SD adapter card.
(3) Insert standard SD card into computer SD slot.
On your computer (Windows), open your file explorer and select the memory card in the side panel.
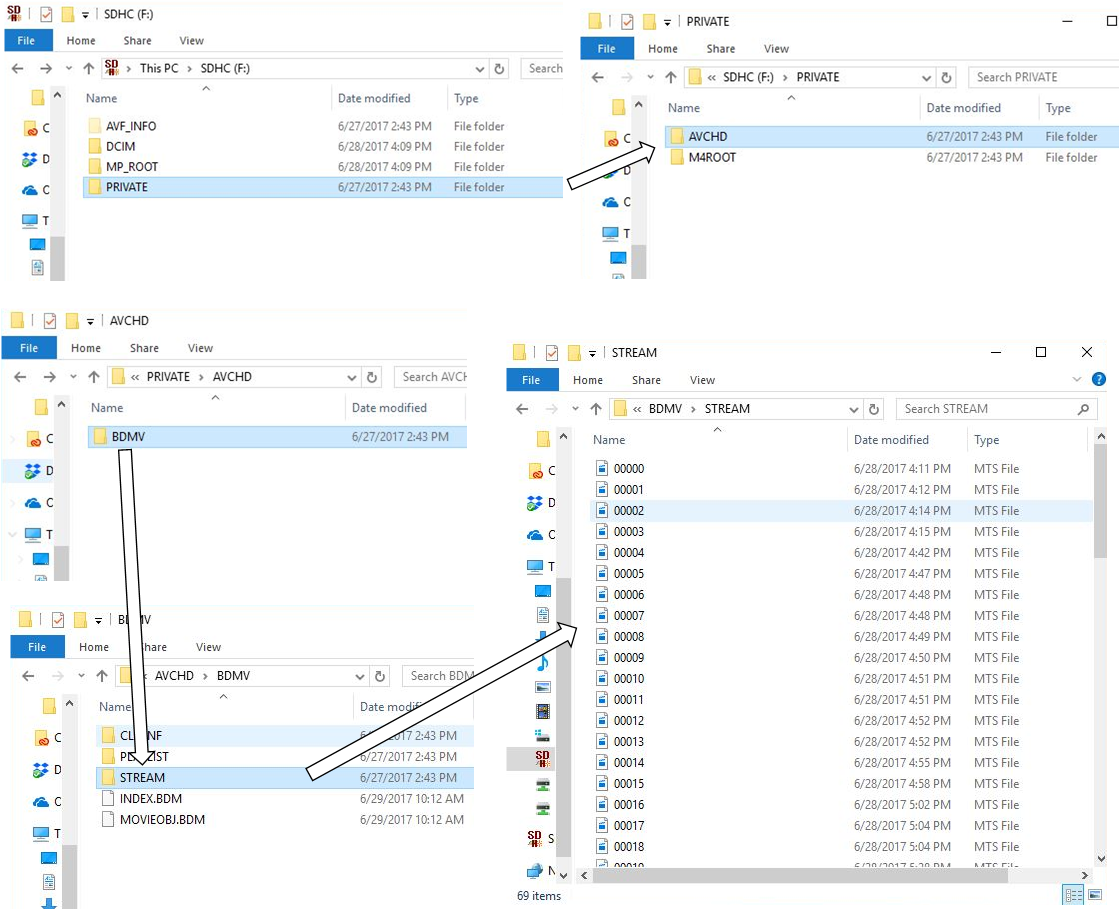
You will then be in the memory card:
1) Open folder PRIVATE
2) Open folder AVCHD
3) Open folder BDMV
4) Open folder STREAM
Find the clips you want and drag them to your desktop or into your editing software.
To fully clear all data on the memory card you may accomplish this when the memory card is in the camera:
Go to Menu > Setup > Format > Select OK to delete all data.